We all want an open, inclusive community to decide on climate-related questions such as: Is a carbon offset legitimate? Is a company realling taking positive climate action? Is a product really green? Yet in the age of social media, it’s hard to know whether people who write reviews have actually bought a product, or even if they’re real people. A Distributed Autonomous Organization, DAO, solves these fundamental problems by tying votes to account holders with real assets, real identities, and real transactions and thus enforce a higher level of truthfulness in community action.
Hence, a DAO is the third and most important part of our operating system for climate action. After some research, we decided on using the Compound DAO developed for the Compound DeFI network. Here is a video of it integrated with our emissions tokens network, showing how the DAO is used to vote on the validity of a carbon offset:
In this tutorial, we’ll go over how to customize and deploy the Compound DAO using our code as an example. Since everything we’re here is open source, you can take a look at the code on GitHub while going through this tutorial.
How the Compound DAO Works
The Compound DAO was developed by Compound Finance to govern their protocol. It allows token holders to make proposals, queues them for voting, and execute the proposals which pass. As the production DAO for one of the largest DeFI networks, it has some built in features to manage the process: A minimum number of tokens is required to make a proposal. Proposals are kept open for a period of time to allow votes to come in. Finally, a quorum of minimum votes is required to pass a proposal.
The Compound DAO has three contracts: Governor, DAO Token, and Timelock. The Governor is the manager of the DAO which accepts the proposals, tallies up the votes, and executes the results. The DAO Token contract tracks the tokens that represent voting power. In our case, we called it “dCLM8“. Finally, the Timelock is a backend contract which executes instructions from the Governor after the required time has passed. This Timelock contract will issue the CLM8 tokens through the NetEmissionsTokens.sol contacts, while dCLM8 tokens represent voting power for the Governor to direct the Timelock contract. It uses the number of blocks on the ledger as a way to keep time and assumes that each block that is minted is equivalent to 15 seconds.
Here’s how they work:
Voters on the network have a token for the DAO (“dCLM8”) for voting on proposals such as whether a carbon offset is valid. In compound, this dCLM8 voting token has a fixed supply of 10 million which are all allocated initially to the address which deploys the contracts by our deployment scripts. To create proposals or vote on them, an account must have dCLM8 voting tokens delegated to their address. Voting token holders can also delegate their tokens to themselves to vote directly. Delegations must be made before a new proposal is active to be able to vote on it. By default in Compound DAO, delegation must happen separately from transfers of voting tokens, but, with our customized version of the DAO, they are delegated automatically when dCLM8 is transferred to a new address. If a user tries to vote with zero eligible votes prior to the creation of the proposal, an error message will return.
Proposals are made by directly calling the Governor contract with the right arguments to issue a token. The number of votes (or total dCLM8 tokens delegated to an address) required to create a proposal is 100k or 1% of the token supply. The minimum number of votes required for a proposal to pass (or quorum) is 400k or 4% of the supply not held by the initial dCLM8 token holder. If a proposal is voted on with 100% of the supply, it will automatically move to either a “succeeded” or “defeated” state. Otherwise, proposals will remain in an active state until the end block of voting, which takes about 3 days assuming 15 seconds per minted block. Once a proposal has succeeded, it can be queued by anyone on the network and will move to a “queued” state. Finally, after two days (as a security measure), anyone on the network can trigger the proposal execution and it will call the arbitrary transaction (specifically by the Timelock contract) and move to an “executed” state.
The Timelock contract is abstracted away from the end-user since it only makes calls to the other two contracts. The Timelock itself is controlled by its own admin, who can delay arbitrary transactions or contract calls on the network using the queueTransaction and executeTransaction functions on Timelock. Since the Timelock is passed as a constructor argument to the governor, it is usually called by the Governor which sends transactions there and not directly. With our DAO, we set up the deployment script to automatically switch the pending admin to the Governor’s contract address, and a few days later, the Governor admin must make a call to the Governor to accept the admin switch.
When a proposal to issue tokens is made through the web application, the parameters are automatically formatted and sent to the Governor as the propose() function, and the proposal will move into a pending state if the call is successful. Though any arbitrary transaction can be made, our interface only supports proposing the issue function on the NetEmissionsTokenNetwork.sol's CLM8 contract. In order for the Timelock to interact with CLM8 contract with the correct permissions, a function only available to the CLM8 deployer is used to set the Timelock address before any proposals are made to issue CLM8 tokens.
Here an example of the parameters passed to the Governor:
targets : [ 0x3D553ACA111AE412d4C722444deeEDBE97423e5E ]
values : [ 0 ]
signatures : [ issue(address,uint8,uint256,uint256,uint256,uint256,string,string,string) ]
calldatas : [ 0x0000000000000000000000002f6846ba17d71d16e7e4aa543bfe6eaf0c65.. ]
eta : 1615351094
What do these fields mean?
targetspoints to the address of theCLM8contractvaluesis the amount of ETH you want to send with an execution to the Timelock, so whoever executes has to send that amount, but we just set it to 0 since it’s not being used right now.signaturesis the function to call, in this caseissuecalldatasincludes the arguments for the issue function (e.g. token type, quantity, description, etc.) encoded to a binary format by the front-end using the AbiCoder object from Ethers.jsETAis the end date for voting in unix time.
These arguments are how the proposals are stored on the blockchain, so the web application decodes the binary data in calldatas to human-readable strings using the AbiCoder object again.
Notice that most of these arguments have plural names and are arrays with only one element. This is because although the Governor supports making up to ten calls in a proposal, the web application currently only supports making one issue call in a proposal.
Customizing the Compound DAO
We’ve made some initial changes to the Compound DAO, including:
- If the entire token supply has voted on a proposal, that proposal is marked as either successful or defeated on the same block as the last vote. In Compound, you must always wait until the end block of voting for successful/defeated to activate.
- Our DAO will automatically delegate a new account’s vote to that account upon receiving DAO tokens, rather than requiring a separate call to delegate like with Compound. A wallet can still delegate to a new address afterwards.
- Multisig delgatation is not supported through the web application.
- The quorum (minimum number of votes required in order for a proposal to succeed) is 4% of the DAO token supply not held by the initial token holder. If the initial holder holds the entire supply, the quorum is set to 4% of the entire supply. On Compound, the quorum is always set to 4% of the entire supply.
- The description of each proposal is stored on-chain rather than only being emitted in an event for indexing by a subgraph, since our deployment environment is a layer 2 where block space is less expensive than on Compound’s Ethereum mainnet.
- When casting a vote, an error message will return if voting with zero eligible votes
Connecting the DAO to the React App
Following the same pattern from our general tutorial, the DAO’s contracts addresses are defined in interface/packages/contracts/src/addresses.js:
const networksAndAddresses = {

  hardhat: {
    network: "Hardhat Network",
    tokenNetwork: {
      address: "0xa513E6E4b8f2a923D98304ec87F64353C4D5C853", // default Hardhat Network deployment address with npx hardhat node
    },
    dao: {
      governor: {
        address: "0x9fE46736679d2D9a65F0992F2272dE9f3c7fa6e0", // default Hardhat Network deployment address with npx hardhat node
      },
      daoToken: {
        address: "0xe7f1725E7734CE288F8367e1Bb143E90bb3F0512", // default Hardhat Network deployment address with npx hardhat node
      }
    }
  },

...
Note, again, that only the Governor and DAO Tokens contract addresses are referenced. The Timelock contract is hidden in the background.
Then, in services/contract-functions.js, we get the contracts addresses with
import { addresses, abis } from "@project/contracts";And later we reference the contracts in methods such as queue, execute, and cancel:
export async function queue(w3provider, proposalId) {
  let signer = w3provider.getSigner();
  let contract = new Contract(addresses.dao.governor.address, abis.governor.abi, w3provider);
  let signed = await contract.connect(signer);

//... then execute the queue function in try/catch block:
    let queueCall = await signed.queue(proposalId);
Which are then imported into the user interface such as the queue-execute-propose-modal.js:
async function submitQueue() {
    setIsSubmitting(true);
    let newResult;
    try {
      let queueCall = await queue(
        props.provider,
        props.id
      );
      newResult = queueCall.toString()
    } catch (e) {
      newResult = e.message;
    }
    setIsSubmitting(false);
    setResult(newResult);
  }
Deploying to Hardhat Locally
Deploying locally to hardhat is easy. Our script does it for you:
$ npx hardhat deploy --network localhostIt will deploy the NetEmissionsTokens network as well as the Governor, DAO Token, and Timelock. Then it will switch the admin of the Timelock to the Governor.
When deployed locally to Hardhat, a few buttons will make testing the contract easier: “Advance Blocks” and “Skip to Block” uses ethers_mine from ethers_project to advance the blocks and hence pass the time for Timelock. “Add 2 days to timestamp” will add to the timestamp of the block using evm_increaseTime, a low level function for private Ethereum networks which can be called via Ethers.js to trick the network into thinking the time has increased.
Deploying the DAO contracts on a testnet/mainnet
Setting up the DAO on a testnet or mainnet without time/block skipping is a two-part process that is performed semi-automatically with the deploy script. The first part is to deploy the three contracts to the Ethereum network and verify contracts with Etherscan, and the second part (taken two days later) is to configure the admin address of the Timelock contract to be set to the Governor contract so that the Governor can queue and execute successful proposals, since the Timelock contract must be initialized before the Governor contract.
The Hardhat project for the DAO contracts, tests, and scripts can be found in the net-emissions-token-network/ directory in hyperledger-labs/blockchain-carbon-accounting on GitHub.
Part 1 – Deploying the contracts and verifying on Etherscan
- Make sure your
.ethereum.config.jsinnet-emissions-token-network/is populated with your deployer/contract owner key, Infura key, and Etherscan key. - In
hardhat.config.js, uncomment the import for.ethereum.config.js, the configuration settings of your network of choice (e.g. Goerli), and the Etherscan settings. - Run this command to deploy:
$ npx hardhat deploy --network goerliThe output should look something like this. Be sure to save the result:
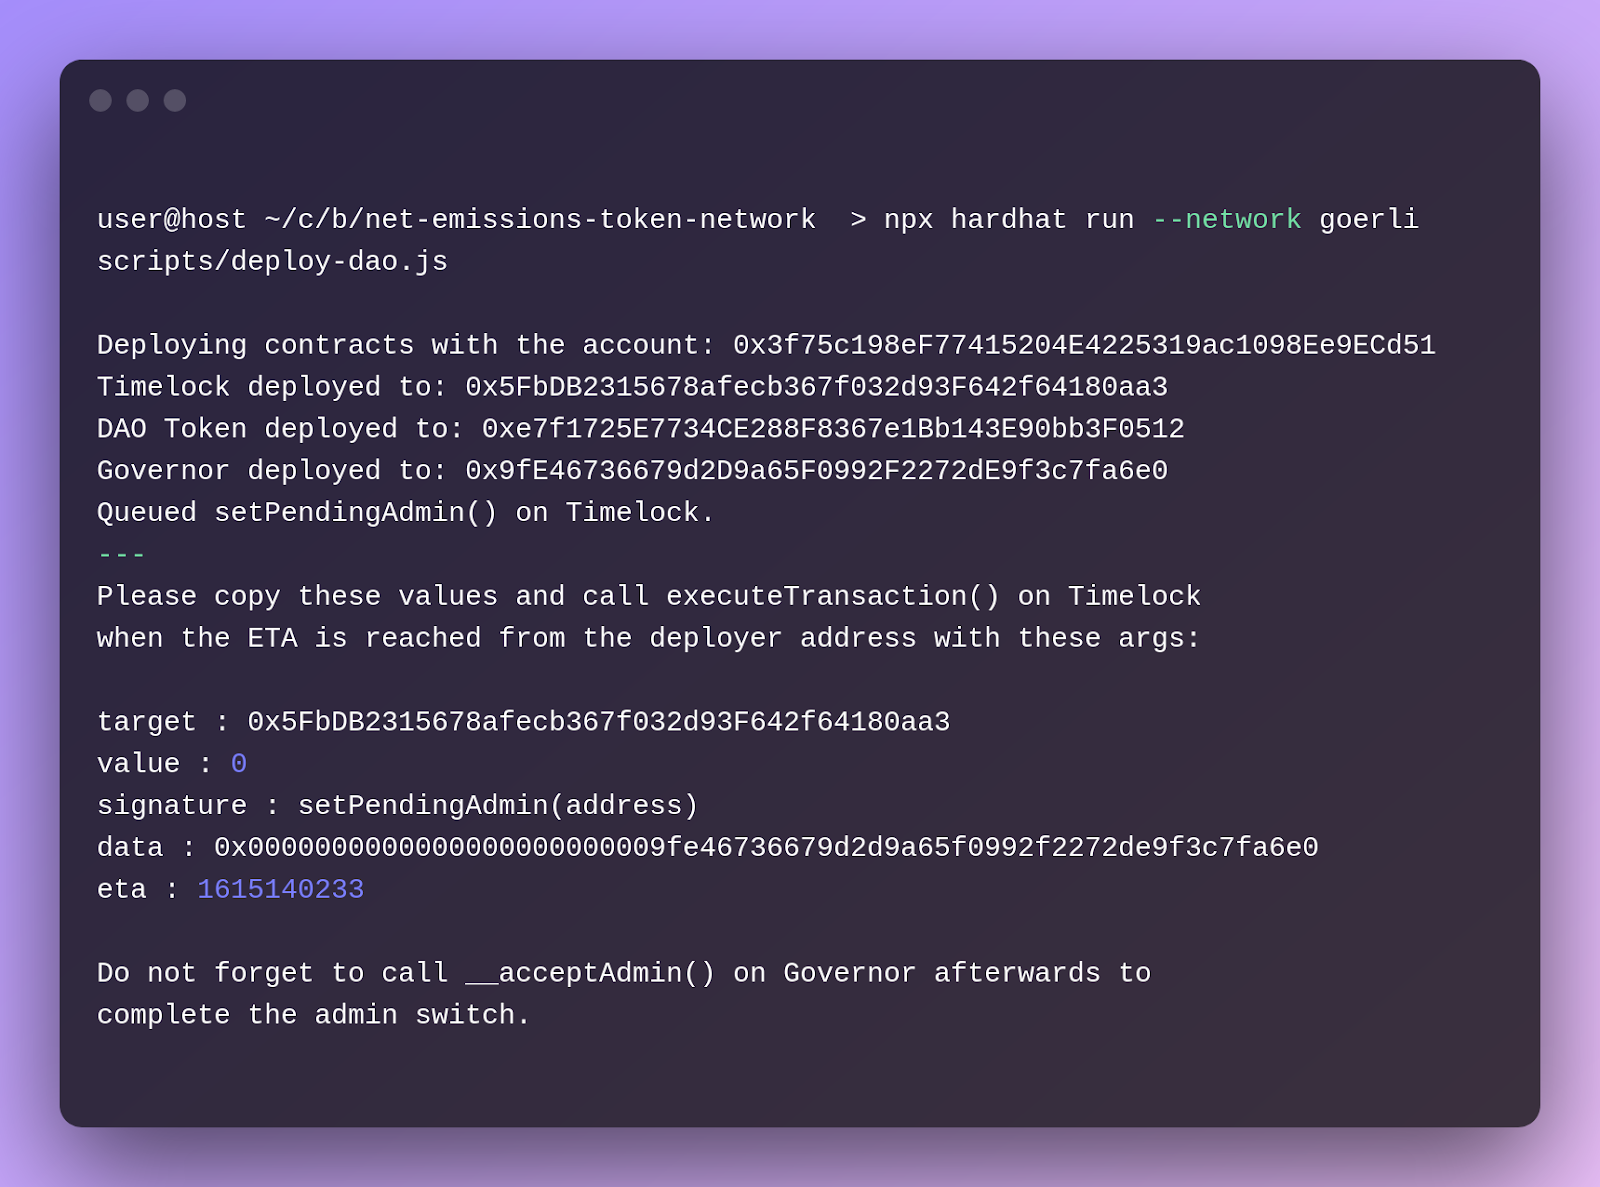
- Verify the contracts individually after recording the addresses from the command above, replacing {} with the correct values (which represent the constructor arguments of the corresponding contracts):
$ npx hardhat verify --network goerli {timelock address} {owner address} 172800
$ npx hardhat verify --network goerli {DAO token address} {owner address}
$ npx hardhat verify --network goerli {governor address} {timelock address} {DAO token address} {owner address}
You can now interact with the contracts with MetaMask using the owner wallet on Etherscan (on the specified testnet) and see the names of the functions. The contracts have been deployed and verified on Etherscan now, but the admin of the Timelock contract is still set to the owner address (an EOA or externally owned account) when it needs to be set to the Governor address so that it can queue proposals for execution. The deploy-dao.js script handles queuing the transaction on the Timelock contract to call setPendingAdmin() and set it to the Governor contract, but it must be executed two days later. IMPORTANT: After running the script, make sure to save the queueTransaction() arguments after deploying to paste into Etherscan two days later.
Part 2 – Configuring the admin of the Timelock contract to be the Governor contract
Now we must call a few transactions to Timelock and Governor to finish switching the admins. Check the Unix time to make sure the ETA has been reached in the queueTransaction() call from the deploy script.
- After the ETA is reached, call
executeTransaction()on the Timelock contract using the owner wallet to executesetPendingAdmin()using the arguments you copied from the deploy script a few days ago.
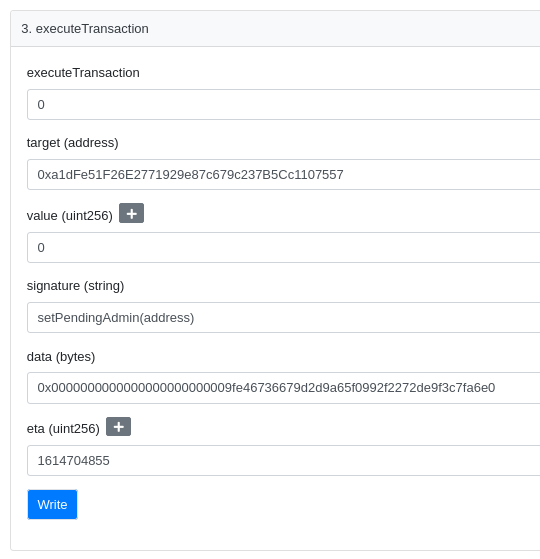
If you try to execute the proposal before the ETA is met, you will receive the error message “Timelock::queueTransaction: Estimated execution block must satisfy delay.”
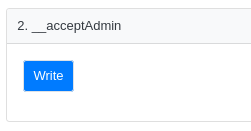
- Now pendingAdmin on the Timelock is set to the Governor (and we can check via Etherscan), but we still need to call
acceptAdmin()on the Timelock from the Governor to complete the transfer. Luckily, there is a helpful function on the Governor to do this without a proposal. On the Governor contract using the admin/guardian account, call __acceptAdmin() to complete the switch from the pending admin to the admin.
Now that the admin of the Timelock contract is set to the Governor, proposals can be queued and executed directly on the Governor using queue() and execute() after reaching an “Accepted” state rather than directly queuing executions to the Timelock contracts and bypassing the governance mechanism altogether.
The DAO is ready! Other important components of governance not described in this tutorial are the DAO token distribution and role or access control set-up with other contracts.
Using the DAO
The DAO token needs to be added to Metamask so the account holder can see the balance. In Metamask, click on the “Add Token” button and then choose Custom Token. Use the dCLM8 DAO token contract address, such as 0x9fE46736679d2D9a65F0992F2272dE9f3c7fa6e0 on local hardhat network.
Then, you will need to transfer the dCLM8 tokens from the contract owner to the other people on your network so they can vote. Use the Metamask “Send” button to send the tokens.
Our customized dCLM8 DAO token will automatically delegate to the recipient, so once the recipient has tokens, they could make proposals or vote on them. The original contract owner, though, has to delegate votes to themselves if they want to vote. Also note that dCLM8 token holders can only vote on proposals created after they received their tokens. Compound DAO will not let them vote on pre-existing proposals.
To create a proposal, you should be a dealer such as the offsets dealer, and instead of issuing an offsets token right away, you would create it as a proposal.
Once a proposal is created, use the “Advance blocks” to move your EVM forward so that the proposal goes from Pending to Active, and the accounts can start voting. Unless all the votes are voted, use “Skip to Block” to skip to the “ends on…” block of your proposal plus 1 so the voting is completed. If the votes were in favor, then the proposal is Succeeded.
Click on Queue to queue the proposal for execution. Proposal is now Queued.
Use “Add 2 days to timestamp” to skip the waiting period to execute the proposal.
Then click on “Execute” in the proposal box to execute the proposal.
If a proposal needs to be cancelled, the contract owner is the only one who could do that in this version of the Compound DAO.
Automated Testing
Automated integration and unit testing for the DAO contracts are available in the Hardhat project and utilize the popular Mocha and Chai JavaScript testing frameworks. The unit tests aim to cover all or most functions and lines of the contract, while the integration tests perform more realistic scenarios.
The tests are all located in net-emissions-token-network/test. The DAO tests can be tested individually with
$ npx hardhat test test/DAO-unit-tests.js
$ npx hardhat test test/DAO-integration-tests.js.
common.js stores logic shared between tests, like deploying the three contracts together and switching the admin of the Timelock to the Governor contract. There are also helper functions to skip blocks and increase the timestamp to simulate time passing (so that we don’t have to wait in real-time for a proposal to change state).
For example, one scenario is tested where there are four DAO token holders with equal tokens. ¾ voting yes will yield a successful state for the proposal, while ¼ voting no will yield a defeated state for the proposal. Other states and edge cases are tested in the unit tests.
For each test that is meant to have a successful proposal execution, the number of CLM8 tokens is counted before and after the proposal execution to confirm the external contract call.